

I created a series of projects for the Dremel campaign on the Make: website. Click one to check out the project overview and a link to the full project PDF files.

Atari Punk Recipe Box

Secret Hollowed-out Book

Deluxe Copper Marshmallow Shooter

Soda Bottle Bike Exhaust

Desktop-Embedded USB Hub

Custom Circuit Board Holiday Tree

Desktop Catapult
Saw Blade Knife

Spooky Jack-o’-Lantern

Brushed Aluminum iPad Stand

Appliance Box Fort

Toolbox Refurb
Make an Atari Punk Recipe Box

Hey, you want to make some chunky 8-bit music? In a recipe box? With Atari paddles? Using a Dremel tool? We thought you might. The “Atari Punk Console” is the name given to the wonderfully retro-sounding stepped tone generator, designed by hobby electronics pioneer Forrest M. Mims III. It is a 556-based timer circuit oscillator that generates a square wave. More importantly, it sounds like Atari 2600 music and is fun to build into a cool enclosure.

Materials:
Dremel Rotary Tool with drill bits, circle cutter attachment/bit, sanding drum
Atari Punk Console kit from makershed.com/apc
Atari 2600 paddle controllers (1) optional but much cooler
Wooden recipe box or cigar box
Red LED, 360 ohm resistor and LED holder
Wire mesh for speaker grill
Screws and nuts for speaker mounting
Velcro tape
Drill press or hand drill and bits for mounted component holes
Soldering iron and solder
Safety goggles
Make a Secret Hollowed-Out Book

I love hollowed out books. They make excellent hiding places or they can be used as unique and tricky double gift wrap. “Ah-ha, it’s a book wrapped up in a book!” I’ve built hollowed-out books before, using the time-honored, frustrating, and very time-consuming hobby-knife method. This time, I decided to speed things up (by hours!) using my Dremel Multi-Max oscillating tool.
Since this made cutting so much quicker, I was also more willing to cut multiple chambers inside the book. Use this method to build a hiding place for your electronics, jewelry, and secret plans for the midnight raid on the cookie jar. It could also be used to make a unique project box for one of your electronics builds.

Materials:
An old hardcover book (I got mine at a thrift store for $2)
Secret items
Dremel Multi-Max oscillating tool with flush-cut wood blade
White glue
Small paintbrush
Pencil
Ruler
Clamps
Hobby knife
Safety goggles
Make a Deluxe Copper Marshmallow Shooter

You are probably already familiar with the PVC pipe marshmallow shooter, a classic, fun weekend project. Maybe you already have one. Next time you show up for some gooey, air-powered confectionary warfare, why not come packing some classy heat — the Deluxe Copper Mini Marshmallow Shooter Mk. II!
You’ll build it from lengths of copper pipe and standard fittings. The Dremel Multi-Max will cut your 1/2″ dia. pipe to length with ease, so no more laboring over a hacksaw. Finally, you’ll need some basic pipe soldering skills to put it all together.

Materials:
Dremel Multi-Max oscillating tool and 3/4″ wood/metal flush cut blade. You could also use the Multi-Max MM462 Wood-Metal flush cut blade (1 1/8″ wide).
Copper plumbing pipe (1) 2′ length of 1/2″ internal diameter
1/2″ copper pipe elbows (2)
1/2″ copper end caps (2)
1/2″ copper T joints (2)
Metal files
Bench vise
Propane torch
Lead-free pipe solder and flux
Emery paper
Safety goggles
Optional:
Threaded copper 1/2″ MIP adapter (1), and threaded copper 1/2″ female adapter (1) for unscrewing the barrel
Tape or a latex glove tip for protecting the mouth piece
Make a Soda Bottle Bike Exhaust

My son has this totally awesome “exhaust” pipe on his bike that I covet. It’s really a resonator for the classic baseball-card-in-the-spokes trick. It makes a terrific racket, and gets people to move out of the way without necessitating a honk on your horn. I decided to build my own, using a recycled beverage bottle. Armed with a Dremel Rotary Tool, a bottle of energy drink, and a depleted gift card, I set out to make my own soda bottle bike exhaust.

Materials:
Dremel Rotary Tool cut-off wheel, 180- and 280-grit abrasive buffs, aluminum oxide grinding stone, and 1/8″ drill bit
Aluminum 16oz. beverage bottle
Hose clamps (2)
Plastic gift card (depleted)
#8 screw (1) with nuts (2) and washer (1)
Pop rivet gun with 1/8″ short aluminum rivets
Permanent marker
Masking tape
Dust mask
Safety goggles
Make a Desktop-Embedded USB Hub

Wires, wires everywhere. I don’t like looking at wires, wires everywhere. Even though I have a USB hub, it’s a bit of an eyesore sitting on top of my desk, plugged into devices up top, and my computer down below. I decided it was time to embed the hub directly into the surface of the desk. Using the Dremel Multi-Max to plunge-cut the wood desktop, I fit the USB hub into the desk, and attached the hub to the underside using brackets. It’s now stable, stylish, and out of the way.

Materials:
Dremel Multi-Max oscillating tool with 1 3/8″ wood flush cut blade, circular drywall/wood blade, and sandpaper attachment
Powered USB hub
1″ metal brackets with screws (2)
Wood rasp
Sandpaper
Epoxy
Pencil
Ruler
Carpenter’s square
Safety goggles
Make a Custom Circuit Board Holiday Tree

Want to build your own custom circuit board, in a fun shape? Don’t want to deal with any etching chemicals? You can use your Dremel Rotary Tool to cut a copper clad board into a unique shape and route festive pathways for your electrons. This technique (sometimes called “dead bug construction” or “ground plane construction”) is a fun way to explore circuit board design and surface-mounting of through-hole electronic components. Plus, the result is a really fun high-tech ornament that displays its technology on the outside.
Note: This is pretty early to be busting out the holiday themed stuff — but I wanted to give people enough lead time if they were inspired to create custom circuit board gifts.

Materials:
Dremel Rotary Tool with metal cutoff wheel, engraving cutter bit, and cutting guide attachment
3″x5″ copper clad board
2xAA battery pack (1) and batteries
SPDT switch (1)
10mm diffuse red LED (1)
5mm red LEDs (5)
5mm green LEDs (5)
56 ohm resistors (6)
10 ohm resistors (5)
Soldering iron and solder
Flux paste
Multimeter
Isopropyl alcohol
320-grit sandpaper
Double-stick foam tape
Small needlenose pliers
Wire stripper
Diagonal cutters
Pencil
Ruler
Safety goggles
Dust mask

Download the Project PDF
(Right click to save the PDF to your desktop.)
Make a Desktop Catapult

Let’s face it, nobody needs a medieval siege weapon on their desk. Or do they? I recently decided that the lack of catapults in our brainstorming sessions at work was negatively impacting our ability to be creative. So I decided to remedy this. My friend Bill Gurstelle is the dean of siege weapons, so I chose to build a modified version of the Roman onager-style catapult from his book The Art of the Catapult. Using only pine, twine, pegs, glue, and a re-purposed night-stand drawer pull, I was able to build a great looking, fun, and functional desktop catapult.

Materials:
Dremel Multi-Max oscillating tool with wood blade, sander attachment, and sanding pads.
Drill or drill press with 1/8″, 3/16″, and 1/4″ bits
1″x1″x48″ length of pine. You’ll use 40″, but it’s good to have extra for
error and kerf.
3/4″x3/4″x10″ length of pine. You’ll use 8″.
3/4″-diameter x 8 1/2″-long wooden dowel. Sold in various lengths, you’ll cut to size.
3/16″-diameter wooden dowel. You’ll need to cut four 1 1/2″ lengths.
1/4″x1 1/4″ hardwood fluted dowel pegs (20)
Small bowl, tablespoon, or other suitable projectile cup 1 1/2″ diameter, with screw for mounting
Wood glue
Clamps
Twine
Wood stain and foam brush (optional)
Carpenter’s square with 45-degree angle gauge
Dust mask
Safety goggles
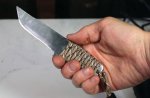
Make a Knife From an Old Saw Blade

Ever since I made my first ninja throwing star in metal shop class, I’ve always wanted to make my own knife. But I was put off by the notion of having to acquire the furnace, anvil, leather apron, and handlebar mustache requisite for forging a proper tempered blade. So, instead I decided to make a utility knife by cutting out a pattern from a circular saw blade, using my Dremel Rotary Tool.

Materials:
7″ steel circular saw blade new, or recycle an old one
Dremel Rotary Tool with metal cut-off wheel, grinding stone, wire brush, polishing wheel and polishing compound
Drill and 3/16″ drill bit
Cardboard and pencil to draw a pattern
Permanent marker
Scissors
Small metal file
Clamps
Safety goggles
Paracord (4′) and plastic cord ends I got both from countycomm.com
Make a Spooky Jack-o’-Lantern, Quick

Halloween’s almost upon us, and it’s time to carve up some jack-o’-lanterns. I have great respect for people who take hours to lavishly carve pumpkin masterpieces. I also have very little time to make my own pumpkins. My kids and I just want to get them carved, set a candle inside, and move on to roasting the seeds as quickly as possible. So I decided to forgo the knife and use a cordless Dremel Multi-Max oscillating tool to make quick work of Mr. O’Lantern. Follow the steps below and you too can crank out an army of chilling, thrilling Halloween pumpkins in no time.

Materials:
Pumpkin
Dremel cordless Multi-Max oscillating tool with drywall blade, flexible scraper blade, and 3/4″ flush cut blade.
Marker
Large spoon for seed removal
Small knife for lid removal
Small metal file
Safety goggles
Make a Brushed Aluminum iPad Stand

My iPad deserves better than the ugly beige plastic cookbook holder I’ve been using to prop it up. Instead of splurging on an expensive pre-made one, I decided to build a one-of-a-kind brushed aluminum stand. A trip to my local hardware store yielded the channel aluminum, flat bar, and hardware fittings I’d need. Cutting, drilling, and finishing with my Dremel made this beauty come together in a single afternoon. The iPad is very secure in this stand, thanks to the angles involved, and a bit of gravity.

Materials:
Dremel Rotary Tool with metal cutting wheel, grinding wheel, and wire brush wheel
Dremel WorkStation 220-01 (or clamps and hand drill)
1/4″ drill bit
41/64″x1/2″x1/16″ aluminum channel (you’ll need a 10 1/2″ length)
1/8″x1/2″ aluminum flat bar (you’ll need two 7″ lengths)
Two 1/4″x1 1/2″ bolts with finish washers and hex nuts
Metal file
Ruler
Permanent marker
Bench vise
Safety goggles
Make an Appliance Box Fort

It’s no secret to kids that a big cardboard box is the best play fort you can have. Find a washing machine box on the curb, drag it home: instant fun. If you want some amenities, such as a drawbridge door or firing slits, you need to put a little extra work into it.
I’ve embellished ours in the past with everything from a Swiss Army knife to a box cutter. Turns out, a Dremel Multi-Max is a much easier, more controllable tool for this than anything I’ve tried. Add some good fasteners and there’s no limit to the size and complexity of the cardboard castles you can construct.

Materials:
Dremel Multi-Max oscillating tool with circular drywall/wood blade
Drill with ¼” bit
Big cardboard box from a fridge or washer/dryer
Cardboard supports that come with the box (optional)
Small cardboard tube
Box rivets from Mr. McGroovy’s or other fasteners
Ruler and pencil
Earplugs
Twine
Make an Old Toolbox New Again

Depressed by the utter unmanliness of the plastic toolboxes at my local hardware store, I headed to the flea market to see if I could do better. I was looking for a heavy-duty hunk of American steel. It didn’t take long to spot a real beauty … if you find rust and worn paint to be beautiful. But how could I resist a box labeled “Park Manufacturing Co?” After talking the seller down to $13, the old beast was mine. None of the rust seemed to be below surface level. Time to take it home, sand it down to the metal, and bring it back to its original glory.

Materials:
Dremel Multi-Max or other oscillating tool/sander with sander attachment, and sanding pads.
Dremel Rotary Tool and wire wheel. You could use sandpaper and wire brushes instead if needed.
Shop cloths or old t-shirts
Masking tape
Primer
Ruste preventative enamel spray paint
Spray truck liner
Safety goggles
Dust Mask
Goggles
